


We are officially in Autumn, and as the Temperature Drops, the Dry Summer we encountered in 2022 starts to feel like a distant memory.
Our Water Reserves here in the UK need a Wet Autumn and Winter, but Isolated Flooding is becoming increasingly common.
Why Channel Drainage?
Household Occupancy has increased in the UK, with more Young Adults staying in the Parental Home longer.
Turning Front Gardens into Driveways is a popular option and has resulted in more pressure on Drainage Systems with increased rain intensity due to climate change.
What is a Channel Drain?
Channel Drainage is generally positioned at the bottom of a shallow incline to allow gravity to direct any water towards the channel drainage.
The Drainage Channel collects the Surface Water and sends it into the System to ensure no water build-up against Property or areas where water could cause a Hazard.
A typical Aco Drain would be installed between a Property and a Paved Area such as a Driveway or Path.
Where would Channel Drains typically be found?-
Car Parks
-
Pedestrian Precincts
-
Driveway
-
Outdoor Paving
The Aco Drain type will depend on the Application and Installation Site.
Aco Drains will have a load class which will Differ.
High Pedestrian Traffic would need a higher loading class than an Aco Drain Channel installed on a Domestic Property.
The Table below shows the Different Load Class for Drainage Channels.
Installing your Drainage Channel
Our Tips are for installing the popular Aco Plastic Channel Drain with Accessories.
You should seek further advice if installing Aco Drainage in Commercial Areas.
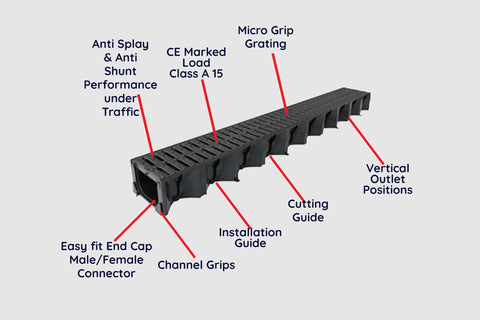
The Hexdrain is suitable for Garage Thresholds, Patios, Paths and Pedestrian Areas around your Property.
The Hex Drains Load Class is A15 and manufactured from recycled plastic.
Hexdrain Aco Drain Outlet Benefits include;
-
CE Marked
-
Fully Certified
-
Anti-Splay
-
Anti-Shunt
-
Channel Clips
-
Vertical Outlets
-
Cutting Guides
-
Micro grip Grating
Installation
|
1, Choose an area which is level to install your Slot Drainage. 2, Clear an area around your Installation Area, including any Bricks, Slabs and Blocks. 3, Build a Trench for the Channel Drainage and lay a minimum 50mm Bed of Concrete 4, Mark your Finishing Height with a Fixed Line 3mm Below your Surface for your correct level. 5, Level off your Concrete with enough clearance for the Channel Drainage 6, Remove any Knockouts for installation and accessories such as Leaf guards. 7, Install your End Caps. 8, Vertically Slide and connect each channel drain. 9, Cut your Connected Drainage Products to the correct Size. 10, Lay your Channel Drain on your firm base. 11, Re-fill your Trench and Install your Surface around your aco raindrain. 12, Install your Grates. 13, Your Installation is now Complete. |
Our Tips for Hex Drain Installation are a Guide as Applications may Differ.
ACO Hexdrain Installation Video from ACO.
Our Team of Experts can help with Installation and Buying Advice.
Remember to clean your Hexdrain on a regular basis.
Channel drainage, such as our HexDrain & RainDrain ranges, is popular choice for domestic applications, effectively removing surface water from patio and driveway areas. For more guidance on maintaining ACO systems, visit https://t.co/FYTTIIGHBP pic.twitter.com/IXdVd2XPTO
— ACO Water Management (@ACOWater) August 20, 2020


